Home Server - Jellyfin: installation and hardware transcoding on Proxmox
In the previous post I left Proxmox configured: disks recognized, ZFS pools created, backups scheduled, IOMMU enabled. The environment is ready to receive services. The first one is Jellyfin.
This post covers the entire process: from creating the LXC container to getting hardware transcoding working with Intel Quick Sync. It’s the longest tutorial in the series so far - there’s a lot to configure, but the result is worth it.
What is Jellyfin
Jellyfin is a free, open-source media server. It lets you organize and stream movies, series, anime and music to any device on your local network: Smart TV, tablet, phone, browser.
It runs 100% locally, no cloud, no account, no subscription. You own the server and the data.
If you already know Plex or Emby, Jellyfin is the free alternative:
| Jellyfin | Plex | Emby | |
|---|---|---|---|
| Price | Free | Freemium | Paid |
| Code | Open-source | Proprietary | Proprietary |
| Limitations | None | Paid features | Paid features |
| Privacy | Total | Collects data | Collects data |
I chose Jellyfin because it’s completely free and doesn’t depend on external servers to work.
Why hardware transcoding matters
Different devices support different video formats. An iPad plays almost everything. An older Smart TV can choke on HEVC (H.265, the video format that delivers better quality at smaller file sizes, but demands more from hardware to decode). When the device doesn’t support the original format, Jellyfin needs to convert the video in real time - that’s transcoding.
Without hardware acceleration, the CPU does all the work. In a heavy transcoding scenario, CPU usage can exceed 90%. With the GPU handling that work, usage drops to 10-15%.
The N5105 (Jasper Lake, Gen 11) has an Intel integrated GPU with Quick Sync Video. That’s exactly what I need.
Part 1 - Create the LXC container
Download the template
In Proxmox, go to Storage (local) → CT Templates → Templates. Search for ubuntu-24.04 or debian-12 and download it.
Create a privileged container
We’ll use a privileged container to allow direct GPU access. In Create CT:
General:
- CT ID: 102
- Hostname: jellyfin
- Unprivileged container: ❌ uncheck
- Password: set a root password
Template:
- Storage: local
- Template: ubuntu-24.04 (or debian-12)
Disks:
- Storage: local-zfs
- Disk size: 40 GB
CPU:
- Cores: 4
Memory:
- Memory: 8192 MiB (8 GB)
- Swap: 512 MiB
Network:
- Bridge: vmbr0
- IPv4: DHCP or static (e.g.
192.168.1.102/24) - Gateway:
192.168.1.1(if static)
DNS: Use host settings.
Click Finish, but do not start the container yet.
Part 2 - Install Jellyfin
Start and access the container
Select the container → Start → access via Console or SSH.
Install via official repository
I’m using Ubuntu 24.04 LTS. The method varies by distro:
Ubuntu 24.04:
# Privileged container runs as root - sudo is optional,
# but included here for best practices and reproducibility outside containers

# Download the official Jellyfin install script
curl -s https://repo.jellyfin.org/install-debuntu.sh -O

# Verify checksum before running (recommended)
# Current hash at: https://repo.jellyfin.org/install-debuntu.sh.sha256sum
sha256sum install-debuntu.sh

# Run
sudo bash install-debuntu.sh
Debian 12 (extrepo, not available on Ubuntu):
sudo apt update && sudo apt install -y extrepo
sudo extrepo enable jellyfin
sudo apt update
sudo apt install -y jellyfin
Three packages are installed: jellyfin (server), jellyfin-ffmpeg (video transcoding) and jellyfin-web (web interface).
Verify it’s running
systemctl status jellyfinThe status should be active (running). If not:
systemctl start jellyfin
systemctl enable jellyfin
Initial web setup
Open http://CONTAINER-IP:8096 in your browser.
Jellyfin presents a setup wizard:
- Language - select your preferred language
- Create admin account - set a username and strong password (this is the main account)
- Libraries - skip for now, we’ll configure these later
- Metadata language - English or your preference
- Remote access - check “Allow remote connections” and “Enable automatic port mapping”
- Finish - log in with the account you created
About remote access:
- Allow remote connections - allows accessing Jellyfin from outside your local network (another phone, a friend’s place, etc.)
- Enable automatic port mapping (UPnP) - Jellyfin tries to configure the router automatically to open the required port
⚠️ UPnP may not work on older routers or if UPnP is disabled. If external access doesn’t work, configure port forwarding manually on your router: forward port 8096 (TCP) to the container’s IP.
At this point Jellyfin is running, but with no content yet.
Part 3 - Configure ZFS storage
The media storage lives in the zpool pool (2x WD Red Plus 4TB in ZFS mirror), the same one I configured in previous posts. We’ll create a dedicated dataset for Jellyfin.
In ZFS, a dataset is like a smart folder inside the pool - it has its own quota, compression and permission settings, and can be mounted anywhere on the system independently.
Create the dataset on the Proxmox host
# Create hierarchical structure
zfs create zpool/jellyfin
zfs create zpool/jellyfin/media

# Set quota (optional - limits how much space the dataset can use)
# Note: personal preference, I left mine unlimited
zfs set quota=1T zpool/jellyfin/media

# Verify
zfs list | grep jellyfin
Dataset permissions
chmod -R 777 /zpool/jellyfin/mediaSecurity note:
777is full permission - fine for a personal home server. In shared environments, configure per-user/group permissions.
Mount the dataset in the container
Still on the Proxmox host:
pct set 102 --mp2 /zpool/jellyfin/media,mp=/home/berserk/mediaParameters:
102- container ID--mp2- mount point 2 (use mp1, mp2, etc. as available)/zpool/jellyfin/media- path on the host/home/berserk/media- path inside the container
Create media folders
Inside the container:
mkdir -p /home/berserk/media/movies
mkdir -p /home/berserk/media/series
mkdir -p /home/berserk/media/anime
mkdir -p /home/berserk/media/shows
The advantage of this structure is that the ZFS dataset can be shared with future containers (Nextcloud, Samba, etc.), since the data lives on the host.
Part 4 - Organize media files
Before creating libraries in Jellyfin, make sure your files are properly organized. Naming conventions directly affect automatic metadata lookup.
What is metadata
Metadata is the information Jellyfin automatically fetches from the internet to give your library a professional streaming look:
- Titles - official name of the movie or series
- Synopses and descriptions - plot summary
- Posters and covers - cover images, backdrops and episode thumbnails
- Cast - actors, directors and production info
- Ratings - IMDb, Rotten Tomatoes scores, etc.
Jellyfin fetches this data automatically from TMDb and OMDb. For this to work, it needs to correctly identify the movie or series - and that’s where file naming comes in.
Movies
The recommended format is:
Movie Name (Year).extensionExamples:
✅ Constantine (2005).mkv
✅ Back to the Future (1985).mkv
❌ constantine.mkv
❌ Back_to_Future.mkv
Each movie in its own folder, name with year in parentheses, no underscores.
Series and anime
Series Name (Year)/Season XX/SXXEXX - Title.extensionExamples:
✅ Breaking Bad (2008)/Season 01/S01E01.mkv
✅ Berserk (1997)/Season 01/S01E01.mkv
❌ breaking.bad.s01e01.mkv
Rules:
- Main folder with name and year
- Subfolders
Season 01,Season 02, etc. - Episodes in
S01E01format - Episode title is optional
- The
1x01format also works, butS01E01is more reliable
Jellyfin is flexible with naming, but following the standard avoids metadata issues. Test first - rename only if necessary.
Part 5 - Create libraries
With files organized, let’s set up libraries in Jellyfin.
Go to Admin Dashboard → Libraries → Add Media Library.
Movie library
| Setting | Definition |
|---|---|
| Content type | Movies |
| Display name | Movies |
| Folders | /home/berserk/media/movies |
| Preferred language | English |
In Library Options:
- ✅ Enable real-time monitoring (detects new files automatically)
- ❌ Prefer embedded titles over filenames
Metadata Downloaders - keep default order:
- The Movie Database (TMDb)
- Open Movie Database (OMDb)
Image Fetchers - keep default (TMDb, OMDb, Screen Grabber).
Save artwork into media folders - ✅ check it. This saves posters alongside files, making backups easier.
Click OK. The scan starts automatically.
Series library
Same process, changing:
| Setting | Definition |
|---|---|
| Content type | Shows |
| Display name | Series |
| Folders | /home/berserk/media/series |
Anime library
| Setting | Definition |
|---|---|
| Content type | Shows |
| Display name | Anime |
| Folders | /home/berserk/media/anime |
Repeat for as many libraries as you need. Separating by type makes per-user access control easier later.
After creating all of them, click Scan All Libraries and wait for processing.
Part 6 - Configure hardware transcoding
This is what separates a functional setup from a truly good one. Without hardware acceleration, every transcoded stream hammers the CPU. With Quick Sync, the N5105 handles it effortlessly.
6.1 Check compatibility
This configuration is for Intel processors with an integrated GPU (iGPU). Most modern Intel chips have one:
- Celeron, Pentium, Core i3/i5/i7/i9 with iGPU
- Gen 9 or higher (Skylake, Kaby Lake, Coffee Lake, Ice Lake, Tiger Lake, Alder Lake, Jasper Lake…)
The N5105 is Jasper Lake (Gen 11), so it’s well covered. If you have AMD or NVIDIA, the passthrough process is similar, but the drivers and Jellyfin options differ.
The official Jellyfin documentation link is at the end of this post.
6.2 Enable GuC/HuC on the host
GuC (Graphics micro-Controller) and HuC (HuC micro-Controller) are micro-controllers embedded in the Intel GPU. By default they’re disabled in the kernel. Enabling them improves transcoding efficiency - HuC in particular handles hardware video decoding.
On the Proxmox host:
nano /etc/modprobe.d/i915.confAdd:
options i915 enable_guc=3The value 3 enables both GuC and HuC simultaneously. 1 enables only GuC; 2 only HuC. For video transcoding, 3 is the right choice.
Reboot the host:
reboot6.3 Pass the GPU to the container
Edit the container configuration on the host:
nano /etc/pve/lxc/102.confAdd at the end of the file:
lxc.cgroup2.devices.allow: c 226:0 rwm
lxc.cgroup2.devices.allow: c 226:128 rwm
lxc.mount.entry: /dev/dri/card0 dev/dri/card0 none bind,optional,create=file
lxc.mount.entry: /dev/dri/renderD128 dev/dri/renderD128 none bind,optional,create=file
This allows the container to access the GPU devices (card0 for display, renderD128 for rendering).
If the host has multiple GPUs, the numbers may differ. Use
ls -la /dev/dri/on the host to verify.
Restart the container:
pct stop 102
pct start 102
6.4 Configure permissions and drivers
Inside the container:
# Verify the devices appear
ls -la /dev/dri/

# Add the jellyfin user to the required groups
usermod -aG video jellyfin
usermod -aG render jellyfin
usermod -aG input jellyfin

# Install VA-API drivers
apt install -y vainfo intel-media-va-driver-non-free

# Test - should list encoding/decoding profiles
vainfo

# Restart Jellyfin
systemctl restart jellyfin
vainfo should return a list of profiles (H264, HEVC, VP9, etc.). If it returns an error, check that the /dev/dri/ devices are accessible.
6.5 Enable in Jellyfin
Go to Admin Dashboard → Playback → Transcoding:
| Setting | Definition |
|---|---|
| Hardware acceleration | Intel Quick Sync (QSV) |
| Enable hardware decoding for | H264, HEVC, MPEG2, VC1, VP8, VP9 |
| Enable hardware encoding | ✅ |
| Enable Intel Low-Power H.264 hardware encoder | ✅ |
| Enable Intel Low-Power HEVC hardware encoder | ✅ |
| Prefer OS native VA-API hardware decoders | ✅ |
AV1: don’t check it. The N5105 (Jasper Lake) doesn’t support hardware AV1 decoding. Only check if you have a newer compatible GPU.
Transcoding thread count: 2-4 (don’t use more than the number of physical cores).
Click Save.
Part 7 - Test and verify
Play content
Access Jellyfin from another device and play a video. If the device doesn’t support the original format, transcoding happens automatically.
Check the logs
In Admin Dashboard → Logs → FFmpeg, look for:
Stream #0:0 -> #0:0 (mpeg4 -> h264_qsv)h264_qsv confirms Quick Sync is being used. If you see h264 (native) or similar, transcoding is in software.
Monitor CPU usage
In Proxmox, select the Jellyfin container and watch the CPU graph:
- Without acceleration: 80-90% CPU
- With Quick Sync: 10-15% CPU
The difference is massive.
But when does Jellyfin actually need to transcode?
The example above was tested through a browser, and that matters. Browsers have limited support for HEVC and HDR. When the client can’t play the original file, Jellyfin converts everything in real time: video, color (HDR → SDR), and audio. That’s why CPU usage climbs.
With a dedicated client that natively supports the format, the behavior is completely different.
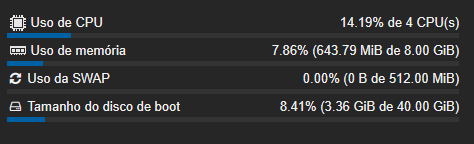
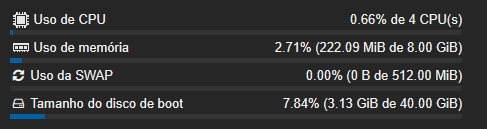
Testing the same 4K HEVC HDR file with a Fire TV Stick 4K + Echo Studio, Jellyfin went into Direct Play: direct playback of the original file, no conversion at all, using less than 1% CPU.
- Browser — Active transcoding (4K HEVC HDR):
- Fire TV Stick 4K — Direct Play (4K HEVC HDR):
| Client | Pipeline | CPU |
|---|---|---|
| Browser | Transcoding (video + HDR + audio) | ~14% |
| Fire TV Stick 4K | Direct Play | < 1% |
A well-configured media server doesn’t process media, it delivers it. The goal isn’t to transcode well, it’s to not transcode at all.
Transcoding isn’t inherent to 4K. It happens when there’s a mismatch between file, client, and configuration. If the client supports the codec, HDR, and audio of the file, Jellyfin does Direct Play and the CPU barely moves. The problem was never the 4K, it’s the player not being up to the task.
This also breaks the common fear that “4K HEVC HDR destroys colors on other devices.” It only does that if Jellyfin has to convert. If the client supports it, the file arrives untouched.
What forces transcoding:
- Browsers (limited HEVC/HDR support)
- Audio incompatible with the client (TrueHD, DTS-HD)
- PGS subtitles in some cases
- Client without HDR support
Troubleshooting
GPU doesn’t appear in the container:
# On the host - check if the driver is loaded
lsmod | grep i915

# If it doesn't appear, verify the i915 module is configured
cat /etc/modprobe.d/i915.conf
vainfo returns an error:
# Reinstall drivers
apt install -y intel-media-va-driver-non-free libva2 vainfo
Jellyfin has no GPU access:
# Check jellyfin user groups
groups jellyfin
# Should show: jellyfin video render input

# Restart
systemctl restart jellyfin
Container won’t start after GPU configuration:
# On the host - comment out the lxc.* lines added
nano /etc/pve/lxc/102.conf
# Add # at the beginning of the problematic lines
pct start 102
Transcoding still uses CPU:
- Check that Playback settings are saved
- Confirm the client device isn’t in Direct Play (in that case it won’t transcode - which is actually good)
- Check the FFmpeg logs
Configuration summary
Proxmox host (N5105):
├── /zpool/jellyfin/media          ← ZFS dataset on WD Red Plus 4TB (mirror)
├── /etc/pve/lxc/102.conf          ← container config with GPU passthrough
└── /etc/modprobe.d/i915.conf      ← enable_guc=3

LXC Container (ID 102 - jellyfin):
├── /home/berserk/media/           ← ZFS dataset mount point
│   ├── movies/
│   ├── series/
│   ├── anime/
│   └── shows/
├── /dev/dri/card0                 ← Intel GPU passthrough
├── /dev/dri/renderD128            ← rendering
└── Jellyfin → http://IP:8096
Key commands
# Create dataset
zfs create zpool/jellyfin/media

# Mount in container
pct set 102 --mp2 /zpool/jellyfin/media,mp=/home/berserk/media

# Pass GPU (edit /etc/pve/lxc/102.conf)

# Configure user
usermod -aG video,render,input jellyfin

# Test GPU
vainfo
Maintenance
Update Jellyfin
apt update
apt upgrade jellyfin
systemctl restart jellyfin
Backup the configuration
Jellyfin configuration lives in two directories:
# Manual backup
tar -czf jellyfin-backup.tar.gz /etc/jellyfin /var/lib/jellyfin
Or use Proxmox’s own backup to snapshot the entire container.
Monitor logs
# Real-time logs
journalctl -u jellyfin -f

# Or via web interface: Admin Dashboard → Logs
Additional resources
- Official Jellyfin Documentation
- Hardware Acceleration - Jellyfin
- Proxmox LXC - Privileged Containers
- Intel Quick Sync Compatibility
- AMD VA-API Support
With Jellyfin running and hardware transcoding working, the home server already fulfills its first objective: a personal media server, no dependency on streaming services, no disappearing catalogs, no subscription.
The next step is configuring client apps, creating users with separate permissions and adding useful plugins like OpenSubtitles for automatic subtitles.